User Guide
This Bob package allows you to use the Menpofit package to detect facial landmarks. Given a gray-level image depicting a human face, this package can be used to extract a specific set of 68 landmarks, as defined in Menpofit. Please refer to the original Menpofit documentation for implementation details. Here, we show some examples of how to use this package.
Landmark Detection on a Single Face
The most simple face detection task is to detect a single face in an image.
This task can be accomplished using the detect_landmarks() function in
this package. The following code-example shows how to extract facial keypoints
for a single face in a gray-level input image:
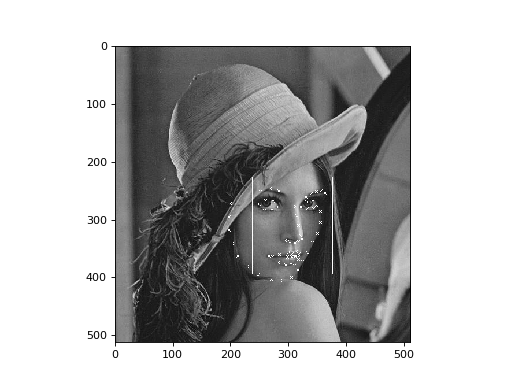
>>> face_image = bob.io.base.load('lena.jpg')
>>> gray_image = bob.ip.color.rgb_to_gray(face_image)
>>> key_points = bob.ip.facelandmarks.detect_landmarks(gray_image, 1)
>>> print(key_points[0].landmarks.shape)
(68, 2)

>>> print(key_points[0].bounding_box.topleft)
(226, 237)

>>> print(key_points[0].bounding_box.bottomright)
(394, 376)
This package also provides a handy function, draw_landmarks(), for
plotting the extracted facial-landmarks on an image.
>>> bob.ip.facelandmarks.draw_landmarks(gray_image, key_points)
The result is shown in the image below:
(Source code, png, hires.png, pdf)

The return value of detect_landmarks() is a list. When only one face
is expected in the input, this list will contain only one element. Each
element in the list is an object of type Result.
The first two members, bounding_box and quality, come from
bob.ip.facedetect. The detected bounding-boxes are sorted in order of
decreasing quality, and the top-N (where N is the value specified for the
parameter top) bounding-boxes are used, one by one, in the
landmark-detection step.
For each detected face, each row in third member of Result called
landmarks represents one of the 68 facial-landmarks, and gives the
coordinates (row, column) of that landmark. As described in the Menpofit
documentation, The facial-landmarks are listed in a specific order in the
array:
jaw_indices = [0, 17]
lbrow_indices = [17, 22]
rbrow_indices = [22, 27]
upper_nose_indices = [27, 31]
lower_nose_indices = [31, 36]
leye_indices = [36, 42]
reye_indices = [42, 48]
outer_mouth_indices = [48, 60]
inner_mouth_indices = [60, 67]
If the bounding-box of the desired face is already available (via a preceding
call to the function bob.ip.facedetect.detect_single_face()), the
function detect_landmarks_on_boundingbox() may be used to determine
the facial-landmarks within this bounding-box. Note that the return-value of
detect_landmarks_on_boundingbox() is a 2D numpy-array representing the
coordinates of the 68 landmarks (and not an object as in the case of
detect_landmarks()).
>>> gray_image = bob.ip.color.rgb_to_gray(face_image)
>>> my_bounding_box, _ = bob.ip.facedetect.detect_single_face(gray_image)
>>> my_key_points = bob.ip.facelandmarks.detect_landmarks_on_boundingbox(gray_image, my_bounding_box)
>>> print(my_key_points.shape)
(68, 2)
Landmark Detection on Multiple Faces
To extract landmarks for multiple faces in the same image, use the top
parameter when calling detect_landmarks(). In the following example,
the input image contains several faces, out of which, landmarks are extracted
for the 5 faces with the best face-detection-quality.
>>> multi_image = bob.io.base.load('multiple-faces.jpg')
>>> gray_image = bob.ip.color.rgb_to_gray(multi_image)
>>> key_points = bob.ip.facelandmarks.detect_landmarks(gray_image, top=5)
>>> for i in range(5):
...   print(key_points[i].bounding_box.topleft)
(136, 2243)
(1480, 2226)
(1574, 2959)
(853, 913)
(107, 3016)