Annotator Guide
This guide explains how to annotate keypoints in images using the built-in
annotation app. We will use an example image from Lenna for this tutorial.
The annotator app is agnostic to images and can load anything that is supported
by bob.io.image.
Image annotation
The application is launched via command-line, which means you need a command prompt, pre-configured with the conda environment containing this package. Open such prompt (e.g. via a Terminal application) and pass the root path containing the images you would like to annotate:
$ conda activate myenv
(myenv) $ bob annotate -vv /path/to/images /path/to/annotations
Once started, you should see a window that looks like the image in Fig. 1.
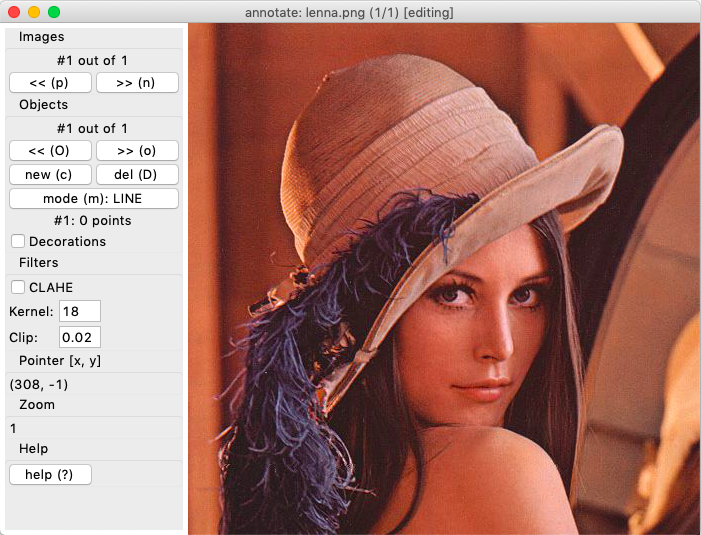
Fig. 1 Main annotation window
The application scans the input folder (/path/to/images in the example
above), looking for files ending in .png. It loads them one by one as you
push the directional buttons on the top left of the window, under the heading
Images. The total number of images and the current image being edited are
shown on the window title and under this part of the application.
The other sections of the left pane show Objects, Filters, Pointer [x,y]
and, finally Help. The Objects section show how many objects have been
annotated on the image. You may annotate any number of objects in each image.
Each annotation is just a set of points clicked on the screen. The sequence in
which the points are clicked is preserved. By pressing the ALT key on your
keyboard (any of the two normally available), the application temporarily
draws on the screen either a line or polygon connecting such dots so you can
better visualize annotated objects. The choice between drawing a line or
polygon on connecting annotated objects can be selected using the button that
says mode on the left pane. You may optionally press the keyboard shortcut
m to switch modes. Notice that lines and polygons drawn at the screen are
drawn only for informational purposes - such information is not recorded to the
output files, which only preserve points and the order in which points were
annotated.
Tip
By using the check-button “Decorations” on the left pane, you may switch ON
or OFF the drawing of line/polygon connectors on the screen. The keyboard
shortcuts t and T can be used to switch ON or OFF this functionality
as well.
To annotate the image, click on the image using a mouse or trackpad. If using
a mouse, use its left button to append a key point to the current object being
annotated. Alternatively, use the a keyboard key to append a new keypoint,
under the pointer cursor, to the active annotation set. When you append a new
keypoint, it becomes automatically the last keypoint on the set. Appending a
keypoint adds it to the end of the current keypoint trail. You may also
insert a new keypoint between other existing keypoints (notice order is
an important factor here). If you wish to insert a new keypoint before an
existing one, in the middle of a sequence, move the cursor so it highlights the
closest keypoint that will come before or after the keypoint you wish to
insert. Once you have it highlit, press i or, alternatively use the
SHIFT key combined with a left-mouse button or trackpad click.
Tip
To better visualize the order of keypoints, enable drawing of Decorations
by either click the check-button on the left pane or pushing the keyboard
key t.
You may switch between the objects annotated using the keyboard
shortcuts o (next) or O (previous), or use the pane on the left. If
you’d like to annotate a new object on the current image, click on create
or use the keyboard shortcut c. To delete an object use the keyboard
shortcut D or click on the del button.
Warning
The application has no undo functionality currently implemented. In case
you make a mistake, but previously saved the annotations, exit pusing the
ESC button on your keyboard. This will cause the application not to
save any of the current image annotations.
Fig. 2 shows an example in which the user annotated two
objects: the top of Lenna’s hat and her face. The number of keypoints
annotated per object is variable. The current set of points being annotated is
highlit in yellow, while the sets not being updated are drawn in white. You
cannot change a set unless it is highlit. To highlight an annotation set for
edition, use o or O as indicated before, or click on the buttons on the
the left pane. Once an annotation set is highlit (in yellow), a single
keypoint will be indicated in red - that is the active keypoint. Keyboard
commands apply only to the active keypoint. To delete a single keypoint, use
the d keyboard shortcut, or the right-button of your mouse. To do so,
first select the keypoint by simply approaching it with your pointer cursor,
without clicking. Once you get close enough, the point of interest becomes
red. Once the point is red, you may delete it using the d keyboard
shortcut. You may also move the point using the arrow keys on your keyboard.
The point from the current active set closest to the cursor is always the
active one.

Fig. 2 Annotating objects
When you change images pushing either n or p, annotations for the
current image are first saved before switching images. You do not need to push
a save button of any sort using this application. The output path, marked on
the above example with /path/to/annotations is the directory where
annotated points will be written to. This path is created if it does not
exist. If it does exist, annotations are preloaded for each image inside
/path/to/images if they exist and annotation is resumed from the point it
was stopped. You may use this technique to continue your previous work, if you
quit the application.
Annotations are saved to the output directory copying the same folder structure found on the input path. For example, if the images were lying like this on the input path:
/path/to/images/subfolder1/image.png
/path/to/images/subfolder2/image.png
/path/to/images/subfolder3/subfolder/image.png
Then, the output path will contain the following files, after the user annotated all images:
/path/to/annotations/subfolder1/image.json
/path/to/annotations/subfolder2/image.json
/path/to/annotations/subfolder3/subfolder/image.json
Annotation format
Annotations are saved in JSON format, which is easily readable and loadable in
a variety of programming environments. The specific format used by the
annotator application may change, but it essentially just lists annotated
points, in the order objects are created. It is a list of lists, in which each
sublist contains coordinates in (y, x) format (height, width).
Here is an example of the JSON file produced for 3 objects annotated on Lenna’s (resolution is 512 by 512): left, right eyes and nose tip, respectively:
[
  [
    [ 273, 248 ],
    [ 264, 271 ],
    [ 279, 285 ],
    [ 280, 264 ]
  ],
  [
    [ 278, 322 ],
    [ 264, 341 ],
    [ 273, 357 ],
    [ 282, 343 ]
  ],
  [
    [ 333, 317 ]
  ]
]
Zoom
You may alternatively control the size of the image being annotated by passing
a zoom parameter (floating point number within the range ]0,+inf[). A
zoom of 1.0 (the default), displays images as they are. A zoom larger than
1.0 upscales the input image making it look bigger than they originally
are. A zoom factor smaller than 1.0 does the inverse, scaling down the
input image. Annotations recorded on the image are independent of the zoom
factor and compensated upon saving operations. To change the zoom factor, use
the --zoom parameter of the annotator app, while starting the application.
For example, to start the application with a zoom factor of 2.0 do:
(myenv) $ bob annotate -vv --zoom=2.0 /path/to/images /path/to/annotations
Tip
You should try to use a zoom factor which is the largest possible given your screen resolution. The image should fit comfortably on the screen without resizing the drawing window. The higher the zoom factor, the more precise will be your annotation. Conversely, the lower, the less precise.
The application supports automatic resizing of the canvas to fill all the available application area, without distorting the image or the annotations. Use this feature to select the largest possible annotation area (typically by fully maximizing the annotation window), which will give you the best possible precision.
Filtering
The application provides a simple filtering option for images being displayed.
If you click on the CLAHE option, the application will apply Contrast Limited
Adaptive Histogram Equalization using
skimage.exposure.equalize_adapthist(). You may control the kernel
size and clipping parameters using the text boxes under the filter heading. If
the filter is already on, and you wish to change its parameters, then click it
off and then on back again. Once the filter is active, it will remain active
for the next images as well. Alternatively use the keyboard shortcuts f to
toggle the filter ON or F to toggle it off.
Further help
Use the flag --help to list all options and examples from the annotation
app:
(myenv) $ bob annotate --help
Read the annotator application help message, by clicking on the keyboard
shortcut ? or the button on the left pane. The help message lists all
known keyboard and pointer/mouse bindings. Familiarise yourself with these
shortcuts as that improves annotation performance, reducing the time you spend
annotating images. You can check the contents of the help dialog through this
documentation, looking at the docstring of the bob.ip.annotator.gui
module.
Tip
The annotation application also has built-in tooltips. As you hover buttons (after a 1 second delay), or specific widgets a temporary help message will display more information.