Sébastien Marcel (marcel@idiap.ch)

Sébastien Marcel - Lab: Face Verification / Face Authentication


Description

Face recognition, verification and identification are often confused. Face recognition is a general topic that includes both face identification and face verification (also called authentication). On one hand, face verification is concerned with validating a claimed identity based on the image of a face, and either accepting or rejecting the identity claim (one-to-one matching). On the other hand, the goal of face identification is to identify a person based on the image of a face. This face image has to be compared with all the registered persons (one-to-many matching).
Here we are focusing on face verification. This page provides various tools such as linux binary programs and python scripts to perform face verification experiments.

What do you need ?

You will need:

Make a selection according to your interest:


For Dummies

In case you don't know anything about face verification experiments, this section is for you. You will find simple examples to do step by step, feature extraction and verification on few data samples.

1. Feature extraction

The basic idea is to transform a raw image into a data sample more appropriate for verification.
Index:
Face extraction from raw image and image normalization
#
# Extract the face from the pgm image 003_1_1.pgm according to eyecenter coordinates in the pos file 003_1_1.pos
#
# This program automatically performs geometric normalization such scaling and rotation compensation to align the eyes.
#
# Options:
#         -facemodel 3 : means to extract the face as a 64x80 image
#         -postype 1   : indicates how to read the pos file
#         -oneface     : precises that there is only one face to extract (the pos file doen't contain the number of faces)
#         -norm        : scales output pixel values between 0 and 1
#         -savebin     : saves the output face into the file 003_1_1.bindata
./bin/faceExtract 003_1_1.pgm 003_1_1.pos -facemodel 3 -postype 1 -oneface -norm -savebin 003_1_1.bindata

#
# Perform photometric normalization on the extracted face
#
# Options:
#         -unnorm    : the input image has pixel values scaled between 0 and 1
#         -mirroradd : mirrors the image and adds it into the output file
#         -norm      : scales output pixel values between 0 and 1
#         -o         : saves the output face into the file 003_1_1.inorm.bindata
#
./bin/binfacenormalize 003_1_1.bindata 64 80 -unnorm -mirroradd  -norm -o 003_1_1.inorm.bindata
		
DCT and DCTmod2 feature extraction from extracted faces
#
# Computes DCT2D of 8x8 image blocks extracted from a 64x80 face image
#
# Options:
#         -unnorm       : the input image has pixel values scaled between 0 and 1
#         -blocktoframe : each DCT vectors are stored as 1 pattern ("1 line") in the output file
#         -block 8      : specifies the size of blocks to extract
#         -overlap 4    : specifies the overlap between blocks (this increase the number of blocks)
#         -dctdim 15    : specifies the number of coefficients of the DCT to keep
#
./bin/bindata2dctbindata 003_1_1.inorm.bindata 64 80 003_1_1.dct.bindata -unnorm -blocktoframe -block 8 -overlap 4 -dctdim 15

		
PCA feature extraction from extracted faces
  1. compute the PCA matrix from a list of files
  2. #
    more files.list
    
    face64x80-eyecenter/003_1_1.bindata
    face64x80-eyecenter/003_1_2.bindata
    face64x80-eyecenter/003_2_1.bindata
    face64x80-eyecenter/003_2_2.bindata
    face64x80-eyecenter/003_3_1.bindata
    face64x80-eyecenter/003_3_2.bindata
    face64x80-eyecenter/004_1_1.bindata
    face64x80-eyecenter/004_1_2.bindata
    face64x80-eyecenter/004_2_1.bindata
    face64x80-eyecenter/004_2_2.bindata
    face64x80-eyecenter/004_3_1.bindata
    face64x80-eyecenter/004_3_2.bindata
    ...
    
    
    #
    ./bin/trainPCA files.list 5120 -verbose -save model.pca
    		
  3. extract Eigenfaces for visualization purposes
  4. #
    # extract 10 eigenfaces for visualization purposes
    ./bin/pca2pgm model.pca 64 80 -eigenface 10 -verbose
    		
  5. projet face images into the PCA sub-space
  6. #
    # projet face images into the Eigenspace defined by the first 8 eigenfaces
    ./bin/bindata2pca 003_1_1.bindata model.pca 5120 -verbose -verbose_level 1 -noutput 8 -o 003_1_1.pca.bindata
    
    #
    ./bin/readbindata 003_1_1.pca.bindata -verbose
    # Reading bindata file (003_1_1.pca.bindata)
    #   n_inputs = 8
    #   n_patterns = 2
    #
    # -6.37015 -0.88155 -6.82804 0.942258 2.41695 0.879379 -1.23869 1.05716
    # -6.37015 -0.881552 -6.82804 0.942257 2.41695 0.879377 -1.23869 -1.05716
    #
    # Please note that all the projections are the same except the last column
    # where the sign is opposite.
    # This is because the 2 patterns into the input file are a face image and its mirror.
    #
    
    #
    # projet face images into the Eigenspace defined by the eigenfaces that contains 96% of the variance
    ./bin/bindata2pca 003_1_1.bindata model.pca 5120 -verbose -verbose_level 1 -variance 0.96 -o 003_1_1.pca.bindata
    # Loading PCA model: model.pca ...
    # Total variance = 1.38248e+09
    # Eigenvalue max = 1.3661e+08
    # Eigenvalue min = 0
    # 0.96 per cent of variance => 571 Eigenvectors selected
    # n_inputs : 5120
    # n_patterns : 2
    # Projection bindata file into PCA space (5120 -> 571) ...
    #
    # Please note that 96% of the variance keeps 571 Eigenvectors with this PCA matrix.
    #
    		
    Reconstructed
    image
    Variance 96% 90% 80% 70% 60% 50% 40% 30% 20% 10%
    Dimension 571 243 94 45 25 14 9 5 3 2
    MSE 0.002 0.004 0.008 0.012 0.019 0.023 0.027 0.028 0.029 0.038
  7. plot projections from different faces 000, 001, 003, 004 in 2D:
    Eigen 1 vs Eigen 2 Eigen 2 vs Eigen 3 Eigen 3 vs Eigen 4
LDA feature extraction from PCA features
  1. compute the LDA matrix from a list of files (face images projected into the PCA)
  2. #
    ls files.list
    face64x80-eyecenter-pca243/003_1_1.bindata
    face64x80-eyecenter-pca243/003_1_2.bindata
    face64x80-eyecenter-pca243/003_2_1.bindata
    face64x80-eyecenter-pca243/003_2_2.bindata
    face64x80-eyecenter-pca243/003_3_1.bindata
    face64x80-eyecenter-pca243/003_3_2.bindata
    face64x80-eyecenter-pca243/004_1_1.bindata
    face64x80-eyecenter-pca243/004_1_2.bindata
    face64x80-eyecenter-pca243/004_2_1.bindata
    face64x80-eyecenter-pca243/004_2_2.bindata
    face64x80-eyecenter-pca243/004_3_1.bindata
    face64x80-eyecenter-pca243/004_3_2.bindata
    ...
    
    #
    ./bin/trainLDA files.list 243 -verbose -verbose_level 1 -n_classes 200 -save model.lda
    		
  3. projet PCA faces into the LDA sub-space
  4. # projet face images into the Fisherspace defined by the first 8 dimensions
    ./bin/bindata2lda 003_1_1.pca.bindata model.lda 243 -verbose -verbose_level 1 -n_output 8 -o 003_1_1.lda.bindata
    
    ./bin/readbindata 003_1_1.lda.bindata -verbose
    # Reading bindata file (003_1_1.lda.bindata)
    #   n_inputs = 8
    #   n_patterns = 2
    #
    # -0.533391 -0.738793 -0.509647 -1.25696 -1.88578 -1.51226 0.925802 0.570457
    # -0.533391 -0.738793 -0.509648 -1.25696 -1.88578 -1.51226 0.925801 0.570457
    
    #
    # Please note that all the projections are the same.
    # This is because the 2 patterns into the input file (the face image and its mirror) are the same in the FisherFace).
    		
  5. plot projections from different PCA faces 000, 001, 003, 004 in 2D:
    Eigen 1 vs Eigen 2 Eigen 2 vs Eigen 3 Eigen 3 vs Eigen 4
Download
Last update: Septembre, 4 2006
Size: 56 Mb

Download

2. Face verification

Remember the definition of face verification at the beginning of this page. The goal of verification is to build a model of a face identity and then to test a data sample against this identity. A data sample from Bob tested against the model of Bob is called a client sample. A data sample from John tested against the model of Bob is called an impostor sample.
Index:
face64x80-eyecenter-metric
Features: grayscale face images (64 pixels width X 80 pixels height)
Classifier: Euclidean metric
#
# lists of data samples for clients 003 and 004

cat 003-train.list
cat 003-test.list
cat 004-train.list
cat 004-test.list

#
# create client models

# model 003
./bin/addfilebindata 003-train.list 003.model

# model 004
./bin/addfilebindata 004-train.list 004.model

#
# test data samples against client models

# client accesses using train data

./bin/metric 003.model 003-train.list 003-003.scores
cat 003-003.scores
#003_1_1 -13.0664
#003_2_1 -14.4222
#003_3_1 -11.5713

./bin/metric 004.model 004-train.list 004-004.scores
cat 004-004.scores
#004_1_1 -10.4297
#004_2_1 -10.0947
#004_3_1 -12.1163

# client accesses using test data

# 003 against 003
./bin/metric 003.model 003-test.list 003-003.scores
cat 003-003.scores
#003_1_2 -16.4022
#003_2_2 -14.8543
#003_3_2 -14.687
#003_4_1 -13.8283
#003_4_2 -14.0687

# 004 against 004
./bin/metric 004.model 004-test.list 004-004.scores
cat 004-004.scores
#004_1_2 -11.8641
#004_2_2 -14.2222
#004_3_2 -15.1961
#004_4_1 -12.9394
#004_4_2 -15.3726

# impostor accesses

# 004 against 003
./bin/metric 003.model 004-test.list 004-003.scores
cat 004-003.scores
#004_1_2 -21.2491
#004_2_2 -21.9622
#004_3_2 -21.48
#004_4_1 -20.9556
#004_4_2 -21.7332

# 003 against 004
./bin/metric 004.model 003-test.list 003-004.scores
cat 003-004.scores
#003_1_2 -18.475
#003_2_2 -17.1209
#003_3_2 -17.9495
#003_4_1 -20.1816
#003_4_2 -18.713

#
# compile all scores
cat 003-003.scores | cut -d' ' -f2 > client.scores
cat 004-004.scores | cut -d' ' -f2 >> client.scores
cat 003-004.scores | cut -d' ' -f2 > impostor.scores
cat 004-003.scores | cut -d' ' -f2 >> impostor.scores

# plot
gnuplot plot.gnuplot
gv plot.ps
	
face64x80-eyecenter-metric-nc
Features: grayscale face images (64 pixels width X 80 pixels height)
Classifier: Normalized Correlation
#
# lists of data samples for clients 003 and 004

cat 003-train.list
cat 003-test.list
cat 004-train.list
cat 004-test.list

#
# create client models

# model 003
./bin/addfilebindata 003-train.list 003.model

# model 004
./bin/addfilebindata 004-train.list 004.model

#
# test data samples against client models

# client accesses using test data

# 003 against 003
./bin/metric 003.model 003-test.list 003-003.scores -nc
cat 003-003.scores
#003_1_2 0.920006
#003_2_2 0.935169
#003_3_2 0.934121
#003_4_1 0.94217
#003_4_2 0.938554

# 004 against 004
./bin/metric 004.model 004-test.list 004-004.scores -nc
cat 004-004.scores
#004_1_2 0.958585
#004_2_2 0.940159
#004_3_2 0.931694
#004_4_1 0.949768
#004_4_2 0.931339

# impostor accesses

# 004 against 003
./bin/metric 003.model 004-test.list 004-003.scores -nc
cat 004-003.scores
#004_1_2 0.869767
#004_2_2 0.860944
#004_3_2 0.866902
#004_4_1 0.873333
#004_4_2 0.863707

# 003 against 004
./bin/metric 004.model 003-test.list 003-004.scores -nc
cat 003-004.scores
#003_1_2 0.901576
#003_2_2 0.915122
#003_3_2 0.907009
#003_4_1 0.882412
#003_4_2 0.898891

#
# compile all scores
cat 003-003.scores | cut -d' ' -f2 > client.scores
cat 004-004.scores | cut -d' ' -f2 >> client.scores
cat 003-004.scores | cut -d' ' -f2 > impostor.scores
cat 004-003.scores | cut -d' ' -f2 >> impostor.scores

# plot
gnuplot plot.gnuplot
gv plot.ps
	
face64x80-eyecenter-metric-td
Features: grayscale face images (64 pixels width X 80 pixels height)
Classifier: Tangent Distance
#
# lists of data samples for clients 003 and 004

cat 003-train.list
cat 003-test.list
cat 004-train.list
cat 004-test.list

#
# to save place you don't have to create client models, you can use directly
# the list of train files with the program metric using the option -mi

# model 003 is 003-train.list
# model 004 is 004-train.list

# client accesses using test data

# 003 against 003
./bin/metric -mi 003-train.list 003-test.list 003-003.scores -td -width 64 -height 80
cat 003-003.scores
#003_1_2 -247.483
#003_2_2 -205.277
#003_3_2 -198.907
#003_4_1 -173.645
#003_4_2 -194.392

# 004 against 004
./bin/metric -mi 004-train.list 004-test.list 004-004.scores -td -width 64 -height 80
cat 004-004.scores
#004_1_2 -119.767
#004_2_2 -182.727
#004_3_2 -208.513
#004_4_1 -150.929
#004_4_2 -210.285

# impostor accesses

# 004 against 003
./bin/metric -mi 003-train.list 004-test.list 004-003.scores -td -width 64 -height 80
cat 004-003.scores
#004_1_2 -422.444
#004_2_2 -454.197
#004_3_2 -439.771
#004_4_1 -417.33
#004_4_2 -451.857

# 003 against 004
./bin/metric -mi 004-train.list 003-test.list 003-004.scores -td -width 64 -height 80
cat 003-004.scores
#003_1_2 -315.887
#003_2_2 -280.822
#003_3_2 -300.7
#003_4_1 -380.179
#003_4_2 -321.847

#
# compile all scores
cat 003-003.scores | cut -d' ' -f2 > client.scores
cat 004-004.scores | cut -d' ' -f2 >> client.scores
cat 003-004.scores | cut -d' ' -f2 > impostor.scores
cat 004-003.scores | cut -d' ' -f2 >> impostor.scores

# plot
gnuplot plot.gnuplot
gv plot.ps
	
face64x80-eyecenter-pca-metric-nc
Features: grayscale face images (64 pixels width X 80 pixels height) projected into 243 Eigenfaces (PCA)
Classifier: Normalized Correlation
#
# lists of data samples for clients 003 and 004

cat 003-train.list
cat 003-test.list
cat 004-train.list
cat 004-test.list

#
# to save place you don't have to create client models, you can use directly
# the list of train files with the program metric using the option -mi

# model 003 is 003-train.list
# model 004 is 004-train.list

# client accesses using test data

# 003 against 003
./bin/metric -mi 003-train.list 003-test.list 003-003.scores -nc
cat 003-003.scores

# 004 against 004
./bin/metric -mi 004-train.list 004-test.list 004-004.scores -nc
cat 004-004.scores

# impostor accesses

# 004 against 003
./bin/metric -mi 003-train.list 004-test.list 004-003.scores -nc
cat 004-003.scores

# 003 against 004
./bin/metric -mi 004-train.list 003-test.list 003-004.scores -nc
cat 003-004.scores

#
# compile all scores
cat 003-003.scores | cut -d' ' -f2 > client.scores
cat 004-004.scores | cut -d' ' -f2 >> client.scores
cat 003-004.scores | cut -d' ' -f2 > impostor.scores
cat 004-003.scores | cut -d' ' -f2 >> impostor.scores

# plot
gnuplot plot.gnuplot
gv plot.ps
	
face64x80-eyecenter-lda-metric-nc
Features: grayscale face images (64 pixels width X 80 pixels height) projected first into PCA (243) and then into LDA (221 dimensions kept)
Classifier: Normalized Correlation
#
# lists of data samples for clients 003 and 004

cat 003-train.list
cat 003-test.list
cat 004-train.list
cat 004-test.list

#
# to save place you don't have to create client models, you can use directly
# the list of train files with the program metric using the option -mi

# model 003 is 003-train.list
# model 004 is 004-train.list

# client accesses using test data

# 003 against 003
./bin/metric -mi 003-train.list 003-test.list 003-003.scores -nc
cat 003-003.scores

# 004 against 004
./bin/metric -mi 004-train.list 004-test.list 004-004.scores -nc
cat 004-004.scores

# impostor accesses

# 004 against 003
./bin/metric -mi 003-train.list 004-test.list 004-003.scores -nc
cat 004-003.scores

# 003 against 004
./bin/metric -mi 004-train.list 003-test.list 003-004.scores -nc
cat 003-004.scores

#
# compile all scores
cat 003-003.scores | cut -d' ' -f2 > client.scores
cat 004-004.scores | cut -d' ' -f2 >> client.scores
cat 003-004.scores | cut -d' ' -f2 > impostor.scores
cat 004-003.scores | cut -d' ' -f2 >> impostor.scores

# plot
gnuplot plot.gnuplot
mv plot.ps plot-dim221.ps
gv plot-dim221.ps &

#
# using less dimensions than available
./bin/metric -mi 003-train.list 003-test.list 003-003.scores -nc -dim 30
./bin/metric -mi 004-train.list 004-test.list 004-004.scores -nc -dim 30
./bin/metric -mi 003-train.list 004-test.list 004-003.scores -nc -dim 30
./bin/metric -mi 004-train.list 003-test.list 003-004.scores -nc -dim 30
cat 003-003.scores | cut -d' ' -f2 > client.scores
cat 004-004.scores | cut -d' ' -f2 >> client.scores
cat 003-004.scores | cut -d' ' -f2 > impostor.scores
cat 004-003.scores | cut -d' ' -f2 >> impostor.scores
gnuplot plot.gnuplot
mv plot.ps plot-dim30.ps
gv plot-dim30.ps &
	
face64x80-eyecenter-lda-mlp
Features: grayscale face images (64 pixels width X 80 pixels height) projected first into PCA (243) and then into LDA (221 dimensions kept)
Classifier: MLP
#
# lists of data samples for clients 003 and 004

cat 003-train.list
cat 003-test.list
cat 004-train.list
cat 004-test.list

#
# train client models

# model 003.mlp trained using 003-train.list not-003-train.list
./bin/mlp 003-train.list not-003-train.list 221 -nhu 9 -mse -iter 100 -save 003.mlp9
./bin/mlp --read 003.mlp9

# model 004.mlp trained using 004-train.list not-004-train.list
./bin/mlp 004-train.list not-004-train.list 221 -nhu 9 -mse -iter 100 -save 004.mlp9
./bin/mlp --read 004.mlp9

#
# client accesses using test data

# 003 against 003
./bin/mlp --test 003.mlp9 003-test.list 003-003.scores 221
cat 003-003.scores

# 004 against 004
./bin/mlp --test 004.mlp9 004-test.list 004-004.scores 221
cat 004-004.scores

#
# impostor accesses

# 004 against 003
./bin/mlp --test 003.mlp9 004-test.list 004-003.scores 221
cat 004-003.scores

# 003 against 004
./bin/mlp --test 004.mlp9 003-test.list 003-004.scores 221
cat 003-004.scores

#
# compile all scores
cat 003-003.scores | cut -d' ' -f2 > client.scores
cat 004-004.scores | cut -d' ' -f2 >> client.scores
cat 003-004.scores | cut -d' ' -f2 > impostor.scores
cat 004-003.scores | cut -d' ' -f2 >> impostor.scores

# plot
gnuplot plot.gnuplot
gv plot.ps
	
face64x80-eyecenter-dctmod2-gmm
Features: grayscale face images (64 pixels width X 80 pixels height) decomposed into blocks of DCTmod2
Classifier: GMM
#
# lists of data samples for the world model and clients 003 and 004 

cat world.list
cat 003-train.list
cat 003-test.list
cat 004-train.list
cat 004-test.list

#
# train the world model (or use the one provided)
./bin/gmm world.list -bin -save world.gmm16 -n_gaussians 16

# read the world model
./bin/gmm --read world.gmm16

#
# train client models 003 by adaptation from the world model
./bin/gmm --adapt world.gmm16 003-train.list -bin -save 003.gmm16
./bin/gmm --read 003.gmm16

#
# train client models 004 by adaptation from the world model
./bin/gmm --adapt world.gmm16 004-train.list -bin -save 004.gmm16
./bin/gmm --read 004.gmm16

#
# merge two GMMs (if needed)
#
./bin/gmm --merge "003.gmm16 004.gmm16" merge.gmm
./bin/gmm --read merge.gmm

#
# Compute log likelihood of client data against the world model
#
# test client 003 data 003-test.list against the world model world.gmm16 and save the log likelihood in 003-wm.scores
./bin/gmm --test world.gmm16 003-test.list 003-wm.scores -bin
cat 003-wm.scores

# test client 004 data 004-test.list against the world model world.gmm16 and save the log likelihood in 004-wm.scores
echo "test client 004 data 004-test.list against the world model world.gmm16 and save the log likelihood in 004-wm.scores"
./bin/gmm --test world.gmm16 004-test.list 004-wm.scores -bin
cat 004-wm.scores

#
# Compute client accesses log likelihood
#
# test client 003 data 003-test.list against the client 003 model 003.gmm16 and save the log likelihood in 003-003.scores
./bin/gmm --test 003.gmm16 003-test.list 003-003.scores -bin
cat 003-003.scores

# test client 004 data 004-test.list against the client 004 model 004.gmm16 and save the log likelihood in 004-004.scores
./bin/gmm --test 004.gmm16 004-test.list 004-004.scores -bin
cat 004-004.scores

#
# Compute impostor accesses
#
# test client 003 data 003-test.list against the client 004 model 004.gmm16 and save the log likelihood in 003-004.scores
./bin/gmm --test 004.gmm16 003-test.list 003-004.scores -bin
cat 003-004.scores

# test client 004 data 004-test.list against the client 003 model 003.gmm16 and save the log likelihood in 004-003.scores
./bin/gmm --test 003.gmm16 004-test.list 004-003.scores -bin
cat 004-003.scores

#
# compile all scores

#
echo "Computing the scores for client accesses (Should produce positive scores)"

foreach a (`cat 003-003.scores | cut -d' ' -f1`)
	set llk_003_003 = `cat 003-003.scores | grep ${a} | cut -d' ' -f2`
	set llk_003_wm = `cat 003-wm.scores | grep ${a} | cut -d' ' -f2`
	set cscore_003 = `echo "$llk_003_003 - $llk_003_wm" | bc -l`
	echo "client access ${a} against model 003 : ($llk_003_003 - $llk_003_wm) = $cscore_003"
	echo $cscore_003 >> client.scores
end

foreach a (`cat 004-004.scores | cut -d' ' -f1`)
	set llk_004_004 = `cat 004-004.scores | grep ${a} | cut -d' ' -f2`
	set llk_004_wm = `cat 004-wm.scores | grep ${a} | cut -d' ' -f2`
	set cscore_004 = `echo "$llk_004_004 - $llk_004_wm" | bc -l`
	echo "client access ${a} against model 004 : ($llk_004_004 - $llk_004_wm) = $cscore_004"
	echo $cscore_003 >> client.scores
end

#
echo "Computing the scores for impostor accesses (Should produce negative scores)"


foreach a (`cat 003-004.scores | cut -d' ' -f1`)
	set llk_003_004 = `cat 003-004.scores | grep ${a} | cut -d' ' -f2`
	set llk_003_wm = `cat 003-wm.scores | grep ${a} | cut -d' ' -f2`
	set iscore_003 = `echo "$llk_003_004 - $llk_003_wm" | bc -l`
	echo "impostor access ${a} against model 004 : ($llk_003_004 - $llk_003_wm) = $iscore_003"
	echo $iscore_003 >> impostor.scores
end

foreach a (`cat 004-003.scores | cut -d' ' -f1`)
	set llk_004_003 = `cat 004-003.scores | grep ${a} | cut -d' ' -f2`
	set llk_004_wm = `cat 004-wm.scores | grep ${a} | cut -d' ' -f2`
	set iscore_004 = `echo "$llk_004_003 - $llk_004_wm" | bc -l`
	echo "impostor access ${a} against model 003 : ($llk_004_003 - $llk_004_wm) = $iscore_004"
	echo $iscore_004 >> impostor.scores
end

# plot
gnuplot plot.gnuplot
gv plot.ps
	
Download
Last update: Septembre, 4 2006
Size: 3 Mb

Download

For the impatients

You can find ready-to-use packages to run experiments on XM2VTS or BANCA:
XM2VTS for the impatients:
This package contains:
  • a simple feature extraction script in C-shell,
  • pre-extracted face features (in case you don't have the original database),
  • groundtruth eye center coordinates,
  • a pyVerif script to run an experiment using a metric.
Last update: August, 31 2006
Size: 18 Mb

Download
BANCA (English) for the impatients:
This package contains:
  • a simple feature extraction script in C-shell,
  • pre-extracted face features (in case you don't have the original database),
  • groundtruth eye center coordinates,
  • a pyVerif script to run an experiment using a metric.
Last update: September, 1 2006
Size: 46 Mb

Download

For geeks (Computer Geeks !)

You are already used to face verification experiments and you want something more advanced. This section is for you. Good luck and Enjoy !

1. Organize your directories for experiments

Let's say you want to perform face verification experiments on XM2VTS.
  1. First, you need to place yourself in a working dir such as
    /home/.../experiments/faceverification/pyverif/xm2vts
  2. Second, I suggest you to create the following architecture:
    .../pyverif/xm2vts/
    		   features/
    			    bin/
    			    scripts/
    		   protocols/  
    		   verification/
    		   		bin/
    		   		samples/
    	
  3. In features you will extract (or copy from here) face features. In features/bin you will copy the feature extraction programs you need. In features/scripts you may put all your scripts to help you to create features.
  4. In protocol you will put protocol files by copying them (see below).
  5. In verification you will perform your face verification experiments. In verification/bin you will copy the face verification programs you need. In verification/samples you will copy the pyVerif scripts you need.

2. Programs for feature extraction

You can get for free these binary programs (Linux only):

3. Programs for face verification

You can get for free these binary programs (Linux only):

4. Scripts for face verification

You can get for free these scripts for pyVerif: using my wrapper of pyVerif:

5. Protocol files

Download the protocol you need
XM2VTS Lausanne Protocol BANCA English Protocol M2VTS Protocol (soon)
Install the protocol
for XM2VTS:
		cd .../pyverif/xm2vts/protocols
		tar -zxvf lp.tar.gz
		
for BANCA:
		cd .../pyverif/banca/protocols
		tar -zxvf english.tar.gz
		
What is the structure of protocol files ?
Protocol variant
A experiment protocol should be associated to every database (lp for XM2VTS, english for BANCA). However, several variations could be introduced in each protocol to observe the behaviour of the system in different conditions (changing the distribution of train/test data). Each variation is called a variant.
There exist 2 variants for XM2VTS (lp1 and lp2) and 7 variants for BANCA (Mc, Ua, Ud, Ma, Md, P and G). For practical reasons, we only provide protocol files for G and P mainly because protocol P includes Mc, Ua, Ud. The interested reader should refer to the paper describing the BANCA protocol.
> ls xm2vts/protocols/lp

files_real_ids.lst  
lp1/  
lp2/  
norm/

> ls banca/protocols/english

files_real_ids.lst  
G/  
P/
norm/  
		
Explaining the nomenclature of data files
The file files_real_ids.lst is database dependent. It is interpreted by pyVerif to specify how to recover the real id from the filename. This assume that all data files from the database follow the same naming convention.
The files_real_ids.lst for XM2VTS is:
def id_of (filename):
    """
    Specific for Xm2vts: real id corresponds the 3rd first chars of the
    file name.
    """

    f = filename.split("_")
    real_id = f[0]
    return (real_id)
		
The following files are from the XM2VTS database:
003_1_1.ppm	means image ppm from person 003 (read id) recorded during session 1, shot 1
003_1_2.ppm	means image ppm from person 003 (read id) recorded during session 1, shot 2
003_2_1.ppm	means image ppm from person 003 (read id) recorded during session 2, shot 1
003_3_1.ppm	means image ppm from person 003 (read id) recorded during session 3, shot 1
003_4_1.ppm	means image ppm from person 003 (read id) recorded during session 4, shot 1
004_1_1.ppm	means image ppm from person 003 (read id) recorded during session 1, shot 1
...
004_3_2.ppm	means image ppm from person 003 (read id) recorded during session 3, shot 2
...
371_4_2.ppm	means image ppm from person 371 (read id) recorded during session 4, shot 2
		
The files_real_ids.lst for BANCA is:
def id_of (filename):
    """
    Specific for Banca: real id is the 3rd first chars of the
    file name.
    """

    f = filename.split("_")
    gender = f[1]
    if gender == 'f':
        gender = "fem"
    else:
        gender = "mal"
    real_id = f[0]
    lang = f[5]
    group = f[2]
    return (group+"_"+gender+"_"+lang+"_"+real_id)
		
The following files are from the BANCA database:
1001_f_g1_s01_1001_en_1.ppm	means image ppm from person 1001 (this person is a female) from group 1 recorded during session 1, shot 1
1001_f_g1_s01_1001_en_2.ppm	means image ppm from person 1001 (this person is a female) from group 1 recorded during session 1, shot 2
1001_f_g1_s01_1001_en_3.ppm	means image ppm from person 1001 (this person is a female) from group 1 recorded during session 1, shot 3
1001_f_g1_s01_1001_en_4.ppm	means image ppm from person 1001 (this person is a female) from group 1 recorded during session 1, shot 4
1001_f_g1_s01_1001_en_5.ppm	means image ppm from person 1001 (this person is a female) from group 1 recorded during session 1, shot 5
...
1001_f_g1_s04_1005_en_1.ppm	means image ppm from person 1001 (this person is a female) from group 1 recorded during session 4, shot 1
...
1005_f_g1_s07_1012_en_1.ppm	means image ppm from person 1005 (this person is a female) from group 1 recorded during session 7, shot 1
...
1027_m_g1_s05_1032_en_1.ppm	means image ppm from person 1027 (this person is a male) from group 1 recorded during session 5, shot 1
...
9001_f_wm_s01_9001_en_1.ppm	means image ppm from person 9001 (this person is a female) from world model recorded during session 1, shot 1
...
9059_f_wm_s09_9060_en_5.ppm	means image ppm from person 9059 (this person is a female) from world model recorded during session 9, shot 5
		
Protocol dev/test files
These are the main protocol files. It indicates the files to use to train the client models and to generate the score files. There are 2 sets of files: the dev set and the test set. In each set, one can find a list of files to train the client models (for_models.lst and eventually for_models_impostors.lst) and to compute clients/impostors scores (for_scores.lst). Protocol dev/test files from XM2VTS:
lp1/dev:
for_models.lst
for_models_impostors.lst
for_scores.lst


lp1/test:
for_scores.lst
		
Protocol dev/test files from BANCA:
P/dev:
for_models.lst
for_models_impostors.lst
for_scores.lst

P/test:
for_models.lst
for_models_impostors.lst
for_scores.lst
		
Please note that the file for_models.lst (and therefore for_models_impostors.lst) is optional in the test set. In which case, we consider all the clients been the same than in the dev set. This is the case with the XM2VTS database where we only compute scores on the test set. On the contrary, in the BANCA database, 2 different sets of clients are available: one for the dev set and one for the test set. In BANCA, the group 1 is considered as the dev set and the group 2 as the test set.
for_models.lst
This file is a table with as many keys than client identities (003, 004, ...,). All the files associated to a given key will be used by pyVerif to generate the list of client files to train the corresponding client model.
003_1_1 003
003_2_1 003
003_3_1 003
004_1_1 004
004_2_1 004
004_3_1 004
...
370_1_1 370
370_2_1 370
370_3_1 370
371_1_1 371
371_2_1 371
371_3_1 371
		
for_models_impostors.lst (optional)
This file is a table with as many keys than client identities (003, 004, ...,). All the files associated to a given key will be used by pyVerif to generate the list of impostor files to train the corresponding client model. This file is only requiered when training models such as MLP or SVM that needs examples and non-examples.
004_1_1 004_2_1 004_3_1 005_1_1 005_1_2 ... 371_1_1 371_2_1 371_3_1 003
003_1_1 003_2_1 003_3_1 005_1_1 005_1_2 ... 371_1_1 371_2_1 371_3_1 004
...
003_1_1 003_2_1 003_3_1 004_1_1 004_2_1 ... 370_1_1 370_2_1 370_3_1 371
		
for_scores.lst
This file is also very important. It indicates which file should be used to be tested against each model. When the real id of the file correspond to the model id this is a client access. When the real id of the file doesn't correspond to the model id this is a impostor access. In the file, you can then find all client accesses:
003_1_2 003
003_2_2 003
003_3_2 003
004_1_2 004
004_2_2 004
004_3_2 004
...
370_1_2 370
370_2_2 370
370_3_2 370
371_1_2 371
371_2_2 371
371_3_2 371
		
and all impostor accesses:
000_1_1 003
000_1_1 004
000_1_1 005
000_1_1 006
000_1_1 009
000_1_1 012
000_1_1 013
000_1_1 016
...
000_1_1 366
000_1_1 369
000_1_1 370
000_1_1 371
000_1_2 003
...
000_1_2 371
...
331_4_2 369
331_4_2 370
331_4_2 371
		
Protocol norm files The norm directory provides for each variant the list of files to use to build the world model if any or to compute the PCA/LDA matrix for instance. For example, here is the file train_world_lp1.lst:
003_1_1 world
003_2_1 world
003_3_1 world
004_1_1 world
004_2_1 world
004_3_1 world
005_1_1 world
005_2_1 world
005_3_1 world
...
370_1_1 world
370_2_1 world
370_3_1 world
371_1_1 world
371_2_1 world
371_3_1 world
		
This file is a table with a unique key. This file should contain at least 2 columns. The last column should contain the same keyword "world", and all the columns before (separated by a space) provide the basename of files to use to build the world model.
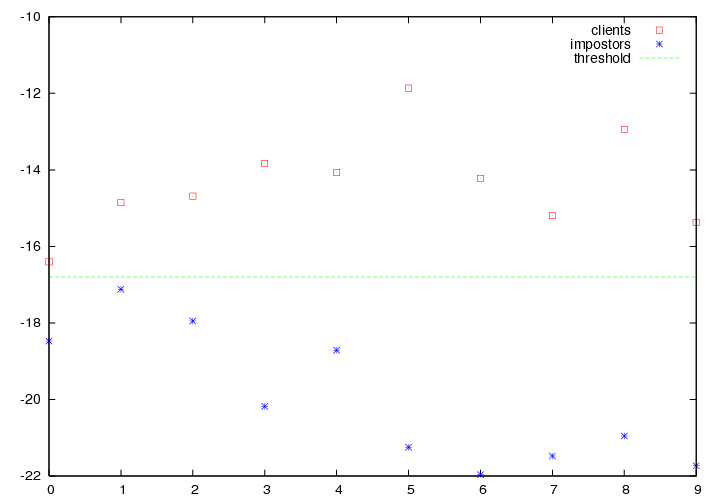
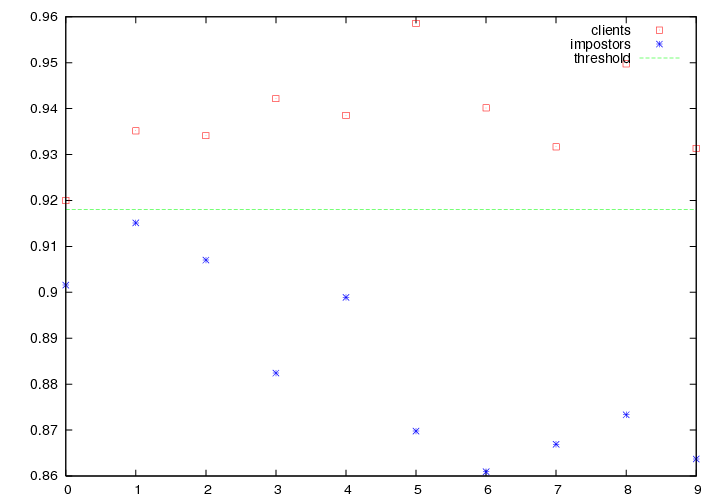
Scores file format
A score file generated by pyVerif contains at least 4 columns. The claim id, the real id, the basename of the claim id, the score. The score can be as simple as a distance between feature vectors or the output of a MLP given a feature vector, or the likelihood of a GMM.
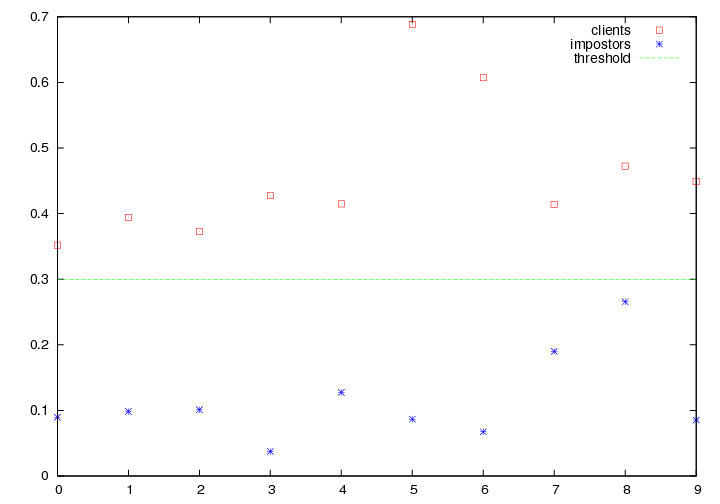
Scores file format of a metric or MLP-based method:
000 003 000_1_1 0.255224
000 003 000_1_2 0.304895
000 003 000_2_1 0.0760654
...
003 003 003_1_2 0.546845
003 003 003_2_2 0.643778
003 003 003_3_2 0.606807
004 004 004_1_2 0.845226
004 004 004_2_2 0.635136
004 004 004_3_2 0.53234
...
		
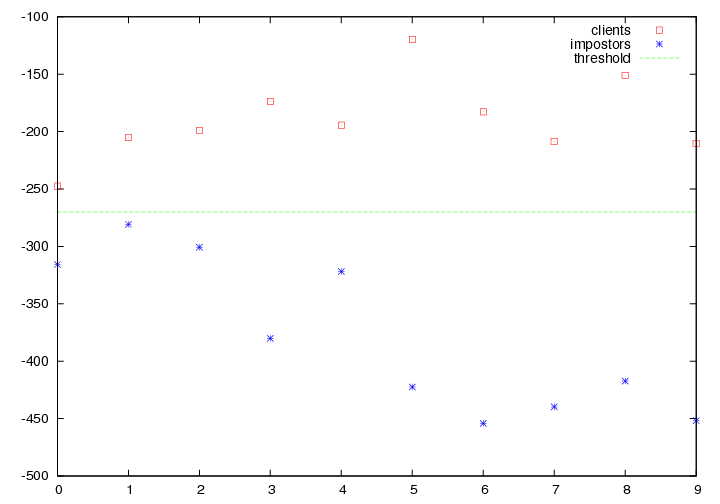
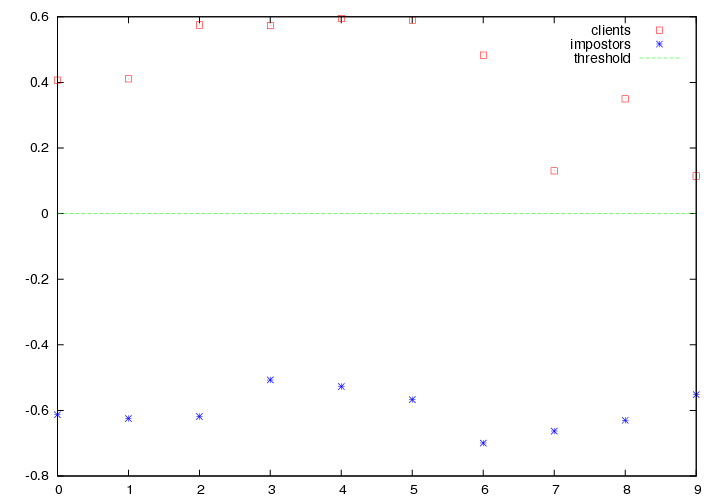
Scores file format of a GMM-based method:
000 003 000_1_1 -100.7 -100.28 -0.42
000 003 000_1_2 -100.716 -100.263 -0.453
000 003 000_2_1 -100.637 -100.052 -0.585
...
003 003 003_1_2 -102.96 -103.431 0.471
003 003 003_2_2 -101.862 -103.337 1.475
003 003 003_3_2 -101.081 -102.313 1.232
004 004 004_1_2 -99.0497 -100.13 1.0803
004 004 004_2_2 -98.9131 -99.7969 0.8838
004 004 004_3_2 -98.3267 -99.2954 0.9687
...
		
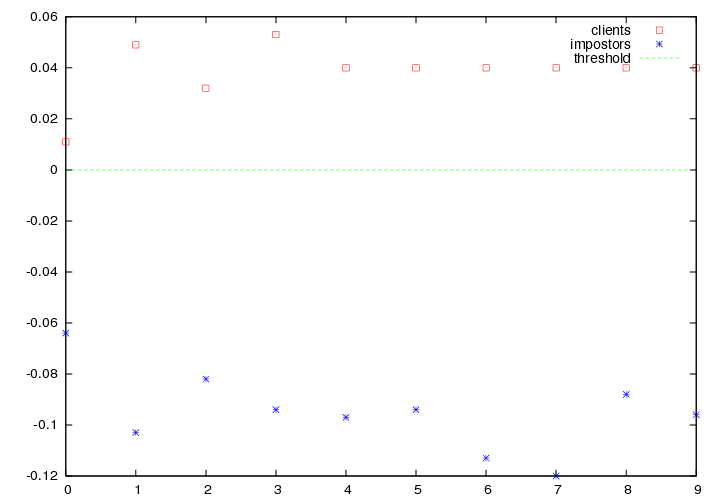
In the case of the GMM, we have 3 columns of scores. The first one is the log-likelihood of the claim for the client model. The second one is the log-likelihood of the claim for the world model. The last column is the difference between the two.
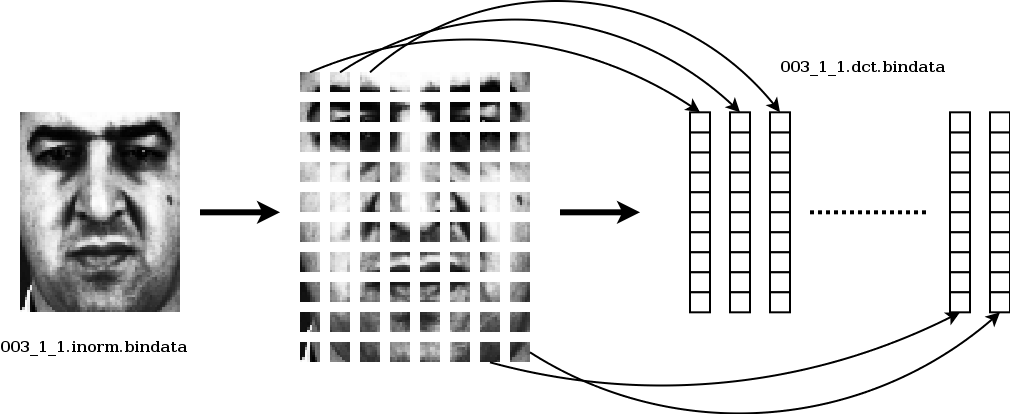
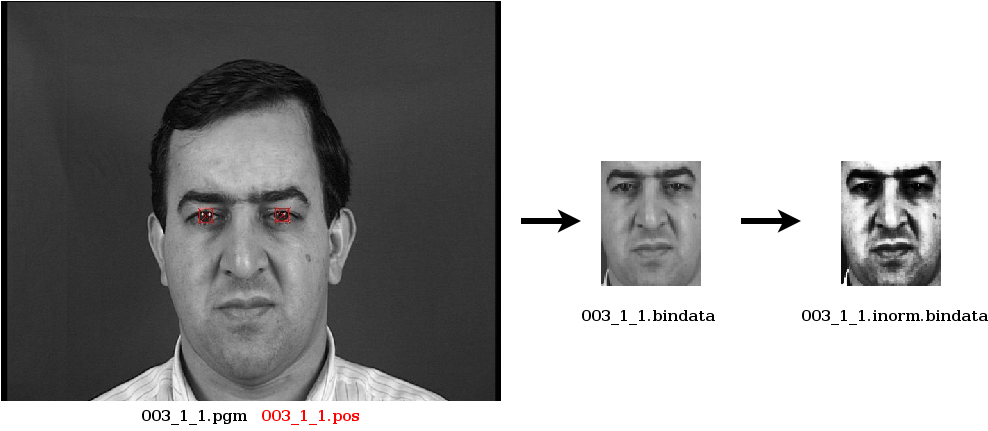
6. Ready to go

#
# run an experiment using a metric
metricface.py -d face64x80-eyecenter-pca243 -o face64x80-eyecenter-pca243-metric-nc -i -t -l -b xm2vts -p lp -v lp1 -m nc

#
# run an experiment using a MLP
mlpface.py -d face64x80-eyecenter-pca243-lda-221 -o face64x80-eyecenter-pca243-lda-221-mlp -t -l -b xm2vts -p lp -v lp1 -u 3 -n 221

#
# run an experiment using a GMM
gmmface.py -d face64x80-eyecenter-dctmod2 -o face64x80-eyecenter-dctmod2-gmm -t -l -v lp1 -n 512
	

For IDIAPers

Of course IDIAP members have access to latest versions of databases, features, programs and scripts. In this section, you will be able to check the status of available ressources (localisation data, features) and also you will find all the information you need to install the complete pyVerif experimental environment to do face verification.
Databases can be found here: /home/vision/common/visidiap/databases
Localization data can be found here: /home/vision/common/visidiap/databases/localisation
Features can be found here: /home/vision/common/visidiap/features

Section under construction


Last update: October 11, 2006.